Verdi 问题总结
本文介绍Verdi的使用。
FSDB Dumping
FSDB是Verdi支持的波形文件。相比标准VCD文件,FSDB通常比其小5-50倍。有三种方式可以导出FSDB文件
- 通过仿真器命令行参数。
- 设置环境变量。
- 在HDL TB中设置FSDB dumping命令。
三种方式的示例如下所示。如果设置了超过一种的方式,则按照 1-2-3的优先级进行设置。具体的参数含义请参考UG。
# 1. Specify the file name on the simulator command line:
simv +fsdbfile+high.fsdb
# 2. Specify the file name through an environment variable:
setenv NOVAS_FSDB_FILE mid_prio.fsdb
# 3. Specify the file name in an FSDB dumping command
#   (in Verilog or VHDL):
$fsdbDumpvars("+fsdbfile+low_prio.fsdb");
纤细的参数设置请参考Francis’s blog。
实际操作发现,无论如何还是需要在RTL TB写 fsdbDumpvars 命令。方法1,2只是覆盖了方法3中指定的参数。如果RTL TB中没有 fsdbDumpvars 系统调用,则不会存储 fsdb 波形文件。
Integration with VCS
中文互联网上搜索到的VCS + Verdi的内容较为老旧,且缺乏基本的流程知识。本文将对此做出较为详细的描述。
KDB
Knowledge Database (KDB) for Verdi, 使得VCS和Verdi使用相同的编译脚本,启动Verdi时不需要再指定文件等参数,实现了Unified Compiler Front-End. 再VCS编译阶段,使用-kdb参数。
# VCS two-step flow
% vcs -full64 -kdb <compile_options> <source files>
再启动Verdi进行Debug时,可以选择下方两种工作模式。
Interactive Debug Flow
首先需要设置环境变量 SNPS_SIM_DEFAULT_GUI 为 verdi。以ZSH启动文件.zshrc为例,
export SNPS_SIM_DEFAULT_GUI=verdi
运行VCS编译后的 simv 文件,加上-gui选项
% simv <simv_options> -gui [-verdi_opts “<verdi_options>”]
Post-Simulation Debug Flow
参考上一节内容,需要首先生成 fsdb 文件。使用下方命令打开fsdb文件
% verdi -ssf <fsdb_file>
UVM Debug
VCS编译
% vcs -full64 -kdb -lca -debug_access+all \
    -ntb_opts uvm-1.2 -sverilog \
    -timescale=1ns/1ns -V \
    +incdir+../sv ubus_tb_top.sv
推荐使用 Unified Front-End的方式打开Verdi Interactive Debug.加上+UVM_VERDI_TRACE=HIER选项可以打开UVM Hierarchy Tree Pane.
% simv -gui +UVM_TESTNAME=test_read_modify_write +UVM_VERDI_TRACE=HIER
NOTE: Post-Simulation Flow还未尝试。
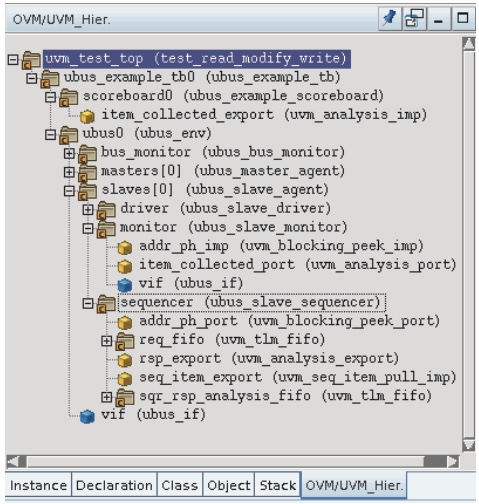
也可以通过一般的方式打开Verdi,但需要手动设置UVM选项。参考UG。
% verdi +UVM_TESTNAME=test_read_modify_write –uvmDebug \
    -ntb_opts uvm –sv ./ubus_tb_top.sv +incdir+../sv
通过菜单栏上的UVM图标可以选择不同的UVM pane.
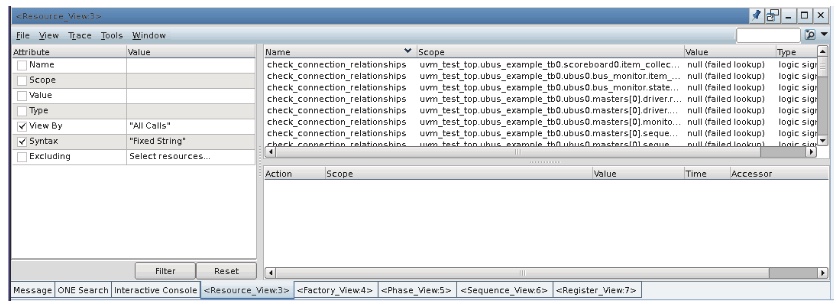
通过不同的pane可以快速进行UVM Debug。
SW/HW Debug
Work Flow
用于嵌入式处理器核心Debug。通过Eclipse连接一个Verdi插件,能够在汇编/C的层级对处理器核心进行Debug。可以可视化调用Stack,以及在时间上同步软硬件Debug。
共分为4个Phase,其整体工作流程如下图。
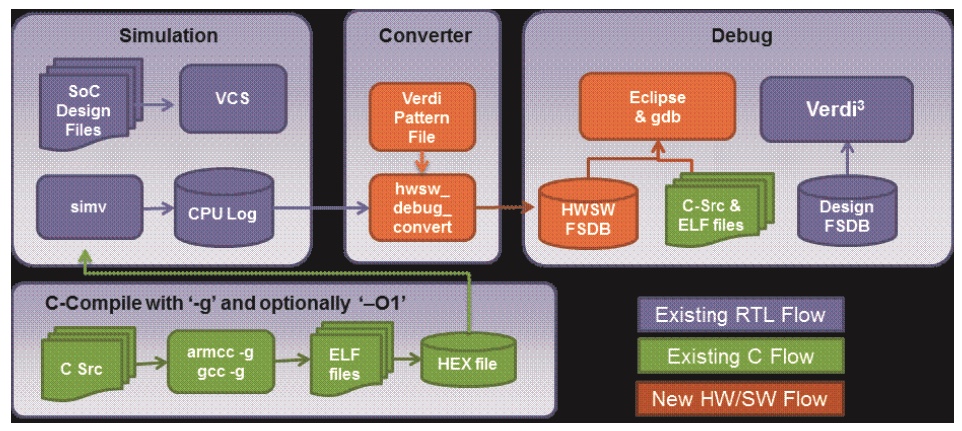
Compilation Phase
软件编译时,需要加入-g选项导出相关debug信息,包括函数名及其内存地址映射,变量名及其内存地址映射,文件名,行号等信息。另外,可根据需要制定优化等级-/O1/O2/O3例如
% gcc -g -O1
% armcc -g -O3
Simulation Phase
CPU仿真,输出log文件,供后续Converter Phase 使用。
Converter Phase
使用hwsw_debug_convert命令,将log文件转换为FSDB文件。如下图所示,其中Patterns文件规定了log文件的格式。
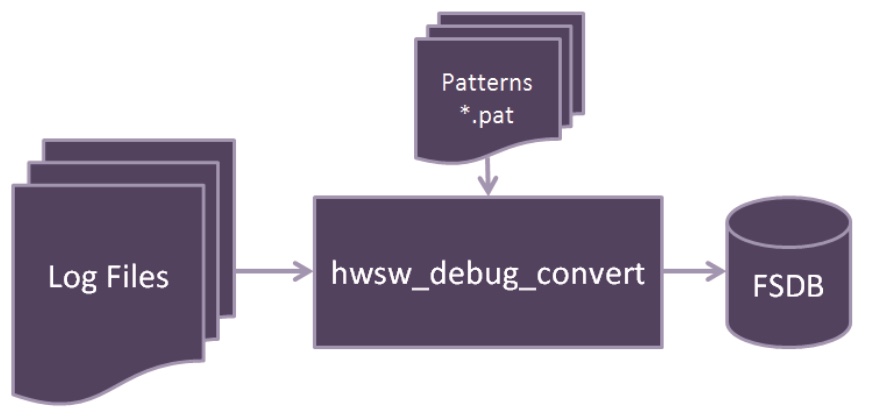
Verdi提供了ARM Cortex核心的patterns文件,位于 $VERDI_HOME/share/hwsw_debug/patterns目录下。以Cortex-M0为例,其格式如下
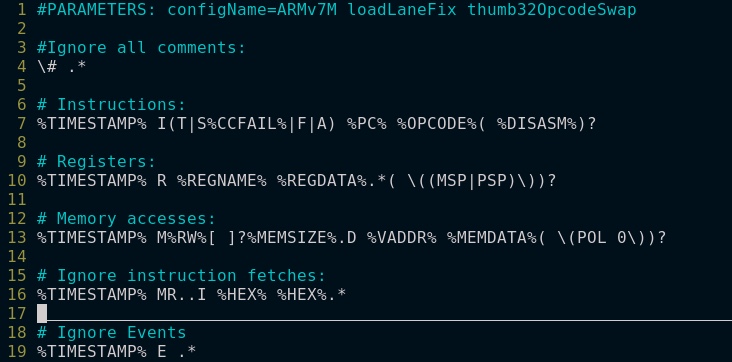
其他CPU核心可以自己修改。使用下方命令生成fsdb文件。详细参数请参考UG。
% hwsw_debug_convert cpuType=Cortex-M3 exeFile=test.elf \
   -i tarmac.log -o hwsw.fsdb
Debug Phase
Eclipse的输入包括C文件,ELF文件以及FSDB文件,Verdi的输入为FSDB文件。命令示例如下,其中VirutalFile.vf的生成参考UG,design.fsdb为硬件仿真FSDB文件。
% hwsw_debug -ssf hwsw.fsdb
% hwsw_debug -ssf hwsw.fsdb \
    -verdi_args "-lib -ssf design.fsdb"
% hwsw_debug -ssf VirtualFile.vf
详细信息请参考下方内容。
Invoking HW/SW Debug
提供两种打开Debug的方式,两者区别摘录如下
In the Hardware-Centric flow, the HW/SW Debug window can be invoked from the Verdi platform to debug the design with both the hardware circuit and the embedded software.
In the Software-Centric flow, the HW/SW Debug window can be directly invoked to focus on the high-level embedded software of interest. If deeper investigation is needed for detailed hardware behavior, the Verdi platform can be invoked on demand.
Hardware Centric Flow
打开Verdi,读入converter phase导出的hwsw.fsdb文件。
% verdi -ssf hwsw.fsdb &
在欢迎界面上选择 Hardware Debug Mode, 之后选择 Tools -> Invoke HW SW Debug进入Eclipse界面。之后的操作与Eclipse类似。
Software Centric Flow
使用 hwsw_debug 命令
% hwsw_debug -ssf hwsw.fsdb &
GUI
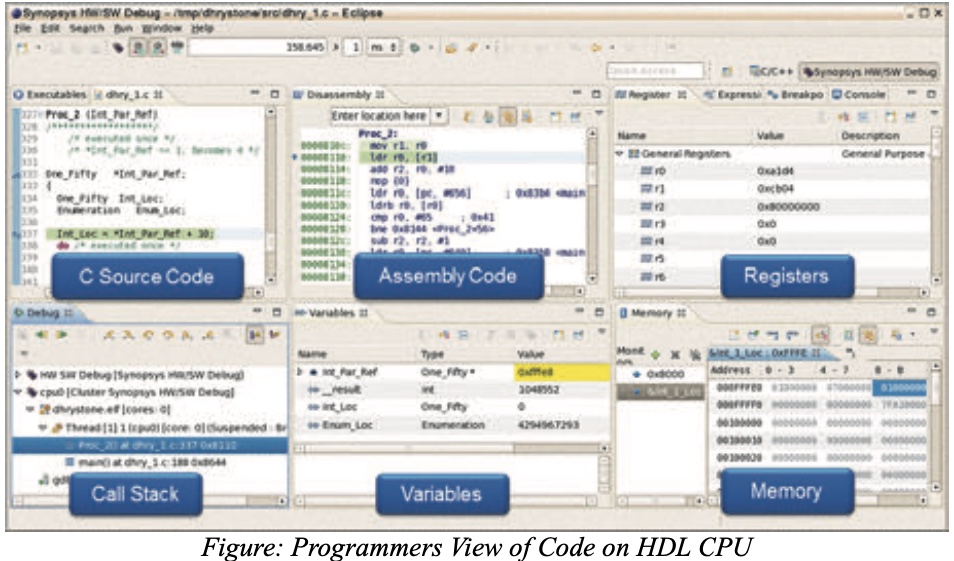
GUI界面如下(UG里只有这张高糊图片)。仿真过程中硬件波形和软件代码能够在时间上同步,加快Debug过程。
Performance Profiling
简要看了一下,感觉与一般CPU软件的Profiling没有大的区别,因此暂不考虑。
Line Coverage
同样,该功能可以在软件仿真阶段完成,因此不展开。
总结
Verdi安装目录下$VERDI_HOME/demo/hwsw_debug/提供了两个Demo,可以参考UG进行实验。
Reference
- Linking Novas Files with Simulators and Enabling FSDB Dumping
- VCS User Guide - Debugging with Verdi
- Verdi UVM Debug User Guide
- Verdi HW/SW Debug User Guide
Leave a comment